This article is an updated version of a blog post originally posted on tilmanbremer.de on February 2nd, 2012.
It’s that time of the year again, the summer season is coming up, and you want to be prepared. Unfortunately, the weather might not be too inviting in March to start practicing outdoors. There are a few 70 m indoor ranges, like the newly built World Archery Centre in Lausanne, Switzerland, or the amazing venue by Guillaume Tell Strassen in Luxemburg. There are a couple of facilities to shoot 70 m indoor in USA, too, like the Easton Archery Centers. Still, chances are high, that there is no 70 m indoor range available to you. I know the problem, and this is why, I came up with a way to simulate the 70 m to be shot almost everywhere. What you need is a regular target and just 5 m instead of 70!
Of course, shooting indoor can never be the same as outdoor. There won’t be any sun, rain or wind. So let’s look at what we can simulate indoors:
- The shooting position (the posture) of shooting the long distance
- The target face size, its appearance in the sight
The second one is easy to do, it is simple trigonometry. You could just scale the target face down to 18m for example:

The scaled target face doesn’t help much as it is. If you would just print a scaled version, slap it on a target 18 m away and start shooting, you would possibly ruin your arrows quite fast when shooting groups of 6 arrows or more. But most importantly, this is not at all the posture like the one when you have shooting 70 m! The posture is actually what I care the most about, because it is so different from indoors and every year it takes a while for me to get used to it.
Your arrows go in a ballistic trajectory which is quite significant on 70 m, even if you are shooting 40 lbs or more. So, if you would shoot in the same posture and with the same sight setting like outdoors, the target to catch that arrow on 18 m would need to be several meters up in the air. That is not viable, so we are moving the target pretty close to you, to catch the arrow before it really had the time to ascend:

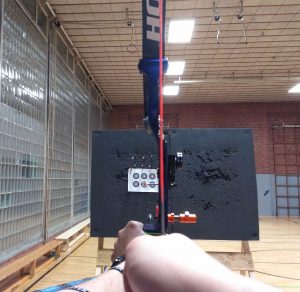
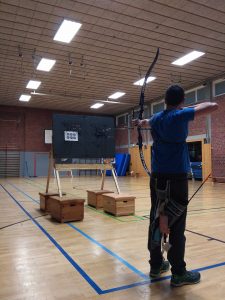
So, now you see why doing the whole thing on 5 m or even closer makes a lot of sense. You probably still need to elevate the target, but just by about 20-50 cm. If you are shooting on large targets such as the 130 cm Danage Domino or other rectangular foam targets, it might even work without jacking up the target at all. If you have your target elevated and moved to 3, 4 or 5 m, you have all what you need. I prepared the target faces to download for you for free:
Print on A4 Paper:
70m_5m_6faces.pdf, 70m_3m_6faces.pdf, 70m_4m_6faces.pdf
Print on US Paper (Letter):
70m_5m_6faces_letter.pdf 70m_4m_6faces_letter.pdf 70m_3m_6faces_letter.pdf
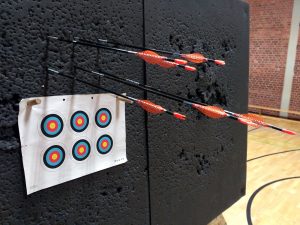
There are always 6 target faces so that you only shoot one arrow per face and not ruin your arrows. I strongly recommend you to do so. Make sure to not let your printer scale the document when printing it.
Following, you have some pictures of that technique in action. These boxes we used to jack up the target are used for gymnastics and they are simply available where we practice. Anything around that height will work.
FAQ
What distance do I need to set my sight to?
Easy! You are simulating 70 m, just set it to 70 m!
The arrows miss the target face and go way to high. Is this right?
It is! With your sight set to 70 m, you will of course miss it. That is not a flaw, but has two very nice advantages. First of all, you can concentrate on shooting, rather than on your score. This is perfect for working on your technique. Secondly, if you would shoot on a target face this small, you would need to change it after a couple of shots. Even the very thin X10s are huge compared to the 50 mm target face 3 m away.
On what distance should I do this?
The reason why there are target face downloads for three different practice distances is, that it depends really on the archer. If you have a young archer with, let’s say 30 lbs, the posture he or she will have when shooting 70 m will have quite an angle. So, doing this training method on 5 m will require the target to be really high. Most likely, the archer will get problems to reach the arrows to draw them. So with a young archery, you might use the 3 m target. On the other hand, if you have an experienced archer with e.g. 50 lbs and very fast arrows, the ascend of the arrow on 3 m is so little, that shots aimed at the lower row of targets might hit the paper or even the target faces of the upper row. You want to get this archer to do the same thing on 4 or 5 m. Myself, with a 45 lbs recurve and X10 arrows, I am using the 4 m distance.
What about the height of the target face?
The height is actually quite important, because it has a great impact on your shooting position. That is why, this is the final thing I am going to discuss. You might think, that the middle of the target face should be 130 cm above the ground, like it is for the regular target face on 70 m. If you are a 1,80 m man or 1,65 m woman, you actually always look down to the middle of the target. For 70 m, the resulting angle is almost irrelevant due to the large distance. But as you move the target closer, the angle gets larger and larger and more relevant. The situation is depicted in the following illustration. So, for 5 m and below, you cannot ignore it anymore if you like to simulate your 70 m posture. In theory, the target face should be attached to the target exactly where the line between your eyes and the center of the target at 70 m cuts the 5 m target. As this is way to complicated, just attach it some centimeters lower than than the height of your eyes, which is about 10 cm less than your body height.

Can I practice like this in summer?
Yes! And if you ask me, you should. The fact, that you can aim and shoot exactly like on 70 m, but there is no score to distract you from whatever you are trying to change on your technique, on your feeling etc. is perfect for practice all year long! You can also use it as warm-up in practice, and it makes a great practice for rainy days in summer!


This is a really clear and excellent description of the issue. Well done! Have you perhaps also done the math (and scaling) for a compound 50m target? Also, as compound targets are placed 4 to a bale, is the difference between the top and the bottom as irrelevant as it for 70m recurve targets. I can really feel a difference in my form between top and bottom target at 50m, so I need to practice both. Thanks for this article!
I was thinking about doing it. I am a recurve archer myself, so I wasn’t sure if that is really an issue for the compound community. Of course you are shooting less high ballistic curves because of the faster bows, so I think the difference in posture between 18m and 50m should be way less than the difference for recurve archers between 18m and 70m. But to be honest, I actually missed the point about the 4 target faces. Let me try to do a compound version of the whole thing :-).
Hi – i really like this idea, and thanks for doing this! Today when i tried it, i set it all up exactly like you said and my arrow still missed the boss by over a meter. I appreciate my sight setting may not be perfect, but definately not a meter! What can i do yo fix this? I look forward to your answer!
If you shoot so much higher than the target face, you must have a rather weak bow, am I correct? If you have a 30lbs bow or less, the angle of your posture is quite different to archers with 40 – 50lbs. In that case you should definitely use the 3m target faces. Did you jack up the target somehow? If you did, maybe it was just not enough. So my suggestion is: Do the whole thing on 3m and place the taget face at the bottom of the boss. Then you will see by how much you miss the target face. Then raise the face to the correct height and measure (!) if you would still savely hit the boss. If not, you have elevate the boss even more.
Hi,
Thank you for this fantastic idea. I just have one question regarding the height placement of the target. I understand that it should be where the view line towards 70m cuts at the 5m target. But the way the template has been designed (3 targets on the top and 3 targets on the bottom) will surely cause some deviations in angles?. Would it then be worth it if I arrange all 6 targets in one single line instead (with centre point of target at 10cm subtracted from my height) or would it not matter much at all?.
You could place the targets in one line, and that would actually be correct, but than you have a larger horizontal angle from the first to the last target. You will never have the perfect simulation, without shooting on just one target. So the two rows are just a practical compromise.
I’m doing a bunch of target angle math lately, and it seemed fitting to add a section showing that your 70m math is right, and giving advice for 50m compounds, as well. The “ShortLongDistance Practice” worksheet shows the math for interested folks. (It looks like there is a significant difference in the test target height for the top and bottom 50m target.)
https://docs.google.com/spreadsheets/d/1xGOPchxPpFBq0VRXiuJb7kkh9UkkU-VO0LPh58HJp3Q
Looks very interesting, thanks for sharing!
Here’s what your article has inspired me to do. I replaced my old target in the basement with one that I can use with your math for practicing long distance:
http://finishtheshot.com/2019/06/long-distance-practice-in-the-basement/
We had an 80 yard tournament with wind and rain, and my extra practice with this method already showed a lot of benefits. This is going to make some big changes for me. Thanks!
Pingback: Long-Distance Practice in the Basement | Finish The Shot
How high would my target butt have to be if I were to set my distance at 10m to simulate 70m?. The reason why I am asking this is that I am planning to install a 60″x60″ net to catch my arrows instead of an actual target butt, that way I won’t have my target butt worn out and needing replacement every few months. Plus, I won’t have to retrieve them as they would naturally fall to the ground once they hit the net. The net has been tested to be safe with 65Ib pound bow at 10m fyi.
It’s hard to say, because it depends on the draw weight of your bow. Is it a recurve? If you know your arrow speed, there should be an easy way to put that number into a calculator to get the ballistic trajectory. If you have that, you can check the height of the arrow at 10 m. Just make sure not to forget the starting height is already around 1.5 m.
Hi , we can only shoot 18m and 30m max at our range.
Do you have any simulation 70m target face for our distance.
Thank you.
Ali
Singapore.